
I have a slight obsession with Halloween – the costumes in particular.
I blame it on my mom. When I was a child, she spent hours sewing and gluing and even paper mache-ing elaborate costumes to transform me into everything from Snow White to Chewbacca. I didn’t quite inherit her knack for crafting, but over the years I have used a little imagination and a whole lot of hot glue to create a number of DIY Halloween costumes for my boys.
Below I attempt to guide you through a few of my favorites, but when it comes to creating your own costumes, it is really about finding an inspiration and letting your imagination be the guide. Things will not always turn out as perfectly as you may envision – expect a bit of trial and error. The goal is not to be Pinterest-worthy – it’s to hash out a plan with your child and have fun bringing it to life. If you do, I guarantee it will be a Halloween you won’t soon forget!
Note: All of the costumes below work equally well on girls!
50 Things to do this Fall around Cincinnati and Dayton
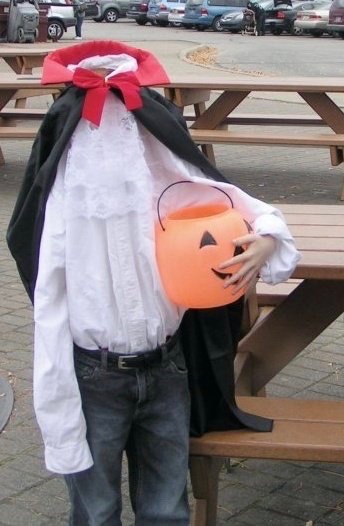
Headless Horseman
Want to have your fellow trick-or-treaters doing a double take this Halloween? This Headless Horseman costume will do the trick.
 What you’ll need
- adult size white business shirt with button-down collar (you’ll want to use an old one)
- one yard of white lace (JOANN’s)
- black cape (a vampire cape with a red collar works well)
- hot glue gun
- plastic pumpkin trick-or-treat bucket
Directions
Have your child put on the shirt, pulling the collar up over the top of his head. Use a pen to mark where his eyes are under the shirt. Remove the shirt and cut two holes where your marks are that are just large enough to allow your child to see out. Cut the lace into three strips starting small and getting gradually longer. Use the hot glue gun to adhere the lace in three overlapping layers – using one layer to cover the eye holes. Have your child put the shirt back on, positioning the eye holes over your child’s eyes and then buttoning the shirt over the top of his head. Tie the cape under the shirts collar, buttoning to secure it in place.
Hint: Ensure your child is able to see well enough through the lace covered eye holes, but you will also want to stay nearby, as it may be a bit tricky for him to navigate at first.
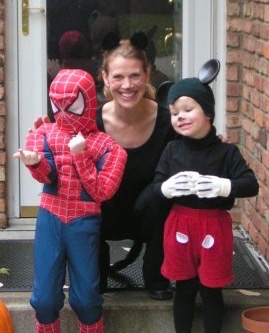
Mickey Mouse
Have a pair of Mickey Mouse ears lying around? Use them as the base for this super-simple DIY Mickey costume.
 What you’ll need
- Mickey Mouse ears
- black stocking cap (try the Dollar Store)
- white knit gloves (try the Dollar Store)
- red shorts
- black tights
- black turtleneck
- one sheet of white felt (Michael’s or JOANN’s)
- black marker
- black pipe cleaners
- hot glue gun
- white chalk
- Optional: yellow spray paint
Directions:
Lay the black knit hat over the top of the Mickey Mouse ears and use white chalk to mark where the base of the ears lines up with the top of the hat. Use sharp scissors to cut slits where you made your marks that are just large enough to allow the ears to fit through. Then use the chalk to draw an ‘m’ shape in the center of the rim of the cap, where it meets your child’s forehead. Use scissors to cut the ‘m’ shape, then slide the cap over the top of your Mickey Mouse ears (instant mouse face!)
Cut 2 circles out of the white felt (use a drinking glass as a template). Affix the circles to the front of the red shorts, using your hot glue gun. Using your black marker, draw three lines on the white gloves to mimic Mickey’s gloves. Pull on tights, then red shorts over top, turtleneck, cap and gloves. Attach a pipe cleaner (or a few wound together) to the shorts to act as a tail. Use black eyeliner to trace a mouse nose on your little one and you are set!
Hint: Want to take it one step further? Spray paint an old pair of your child’s tennis shoes with yellow spray paint to mimic Mickey’s signature shoes.
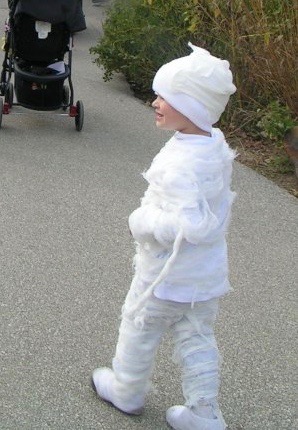
Mummy
This one is quick, easy, and oh-so-adorable on little ones.
 What you’ll need
- white t-shirt or turtleneck
- white or light grey leggings or sweatpants
- white stocking cap (try the Dollar Store)
- several packages of cheesecloth (Lowe’s or Home Depot in the painting section)
- hot glue gun
Directions
Using your hot glue gun, attach the cheesecloth to the t-shirt and pants (separately) and then the cap, winding as you go to mimic the mummy bandages.
Hint: If you can stretch the shirt and pants over the back of a chair and the cap over a small pumpkin or ball, it will make it easier to wrap the bandages. Be sure to leave a few strands hanging to give it that “unraveling” look.
Bonus: the dirtier the bandages get, the more authentic it will look!
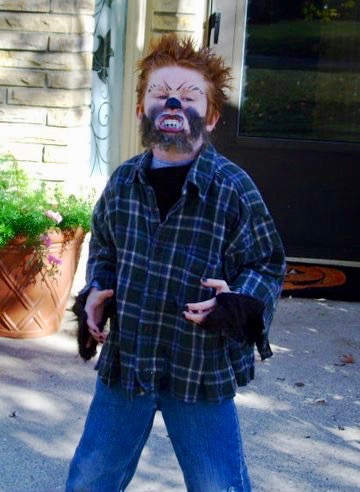
Werewolf
A werewolf is a timeless Halloween staple – and very easy to create on your own.
 What you’ll need
- old flannel shirt
- old jeans
- fake fur (JOANN’s)
- face paint and/or brown eyebrow pencil
- extra hold hair gel
- plastic fangs
- optional: Spirit gum + fake hair
- optional: black nail polish
Directions
Start by cutting slits in the arms and bottom of the flannel shirt, as well as the bottom of the jeans (to make it look like they are shredded). Next, cut strips of the fake fur and hot glue them to the inside of the chest section and arms of the plaid shirt (to mimic the wolf’s fur busting out from his clothes). For the face, use the brown eyebrow pencil to create distinct brows and a wolf nose. We opted to attached fake hair (from a Halloween store) to our son’s face to round out the look. However, this is tricky. If you want to go this route, I would suggest only using on older children and not children who to tend to have allergies or sensitive skin. Always test on a small section of skin before applying to the face. We used Spirit gum (available at most Halloween stores and comes with its own remover). Apply sparingly. The safer route is to use your eyebrow pencil to draw whiskers on your child’s face. Put a liberal dose of hair gel in your child’s hair to give him that crazed wolf look, add the plastic fangs and your child is ready for the next full moon.
Hint: A little black nail polish really finishes off the look!
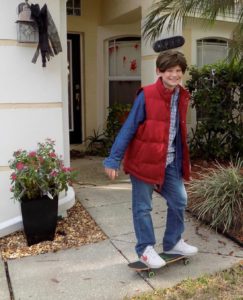
Marty McFly
Everybody loves a nostalgic movie character and Marty McFly from Back to the Future is a classic (and easy to pull off).
 What you’ll need
- red vest (We ordered this from jcpenney.com, but you could also use a red sweater vest or red jacket with the sleeves cut off to save money. Goodwill is another great place to check.)
- long sleeve denim shirt
- long sleeve plaid shirt
- plain white tennis shoes or Nikes with the red swoosh if you have them
- skateboard
- Optional: brown wig
Directions
The secret here is layering. Marty wore a specific layer of red puffy vest over denim shirt over plaid shirt. Goodwill is a great place to start if you don’t have these items on hand. The match doesn’t have to be perfect; it is just that layered look you are after. For the shoes, start with a pair of plain white leather shoes (again, Goodwill is bound to have these cheap) and use a red Sharpie to draw on that signature Nike swoosh. If you have a pair of Nikes on hand, you can trace out a template of the swoosh – otherwise, just wing it! For lighter haired children, a basic brown wig will help pull off the look. Add a skateboard and you are good to go!
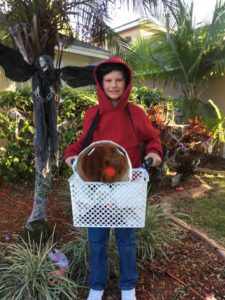
Elliot from E.T.
Another beloved movie character from the 80s, Elliot and his sidekick E.T. are a bit harder to pull off – but totally worth the effort. If you happen to have an old E.T. stuffed toy from your childhood, it will make this costume much easier.
 What you’ll need
- red hooded sweatshirt
- white basket or milk crate
- handlebars from a bike (either from one of your children’s bikes or look at a salvage yard)
- E.T. stuffed toy or cardboard and a Sharpie
- luggage strap or other neck strap
- zip ties
- white towel or blanket
Directions
We actually removed the handle bars from my son’s bike (very carefully) and affixed them to the white basket using zip ties. The strap we used was from my son’s saxophone case, but a luggage strap would also work well – simply clip it to the basket to make it easier for your child to haul the basket around all night. If you have an E.T. toy on hand, simply drape it in the white towel or blanket and put it in the basket. If not, you can create an E.T. face using brown cardboard and a sharpie and then use a paint stir stick or yard stick to attach it to the inside of the basket and drape the towel or blanket around the cut out. Throw on the red hoodie, strap on the basket and your child is ready to take off!
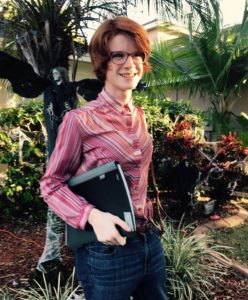
Worried about breaking those gender stereotypes? Don’t be. Here is my now-teenage son dressed as Barb from the Netfilx series, Stranger Things. If your kid is comfortable and it works, go for it!
Have a safe and Happy Halloween!